
The most common mistake when performing REST API authorization process
One of the multiple features that Price2Spy has to offer is the REST API interface. However, there is one very important point when using REST API which seems to cause confusion among our clients, and it is related to performing the authorization process.
New authentication method
If you are starting to use Price2Spy or its REST API interface please follow the steps below. If you are an existing Price2Spy client who is already using our REST API and need access to the old documentation, please find it under ‘Old authentication method’.
You can authenticate HTTP requests by using the HMAC-SHA256 authentication scheme. (HMAC refers to hash-based message authentication code.) These requests must be transmitted over TLS.
Prerequisites
- Client ID – <Your client ID>
- Client Secret – <Your client secret>
- Values for these credentials can be obtained from your Price2Spy account under Integrations > API, if you have a premium account.
Provide each request with all HTTP headers required for authentication. The minimum required are:
| Request header | Description |
| Host | Internet host and port number. (api.price2spy.com:443) |
| X-P2S-Date | Date and time at which the request was originated. It can’t be more than 15 minutes off from the current Coordinated Universal Time (Greenwich Mean Time). The value is in UNIX Epoch format. |
| Authorization | Authentication information required by the HMAC-SHA256 scheme. Format and details are explained later in this article. |
Example:
Host: api.price2spy.com:443
X-P2S-Date: 1700417770
Authorization: HmacSHA256 {Client_ID}:{Signature}
For POST and PUT requests. If DELETE request has a body, it must be provided as well.
| Request header | Description |
| Content-Type | This header must be “application/json” |
Authorization header
Syntax
Authorization: HmacSHA256 {Client_ID}:{Signature}| Argument | Description |
| HmacSHA256 | Authorization scheme. (required) |
| Client ID | Your Client ID. (required) |
| Signature | base64 encoded HmacSHA256 of String-To-Sign. (required) |
Client ID
Value of the client ID used to compute the signature.
Signature
Base64 encoded HmacSHA256 hash of the String-To-Sign. It uses the Client Secret identified by Client ID. base64_encode(HMACSHA256(String-To-Sign, Client_Secret))
String-To-Sign
It is a canonical representation of the request:
String-To-Sign=
HTTP_METHOD + ‘\n’ +
host_with_port + ‘\n’ +
content_type + ‘\n’ +
resource_path + ‘\n’ +
date_in_unix_epoch + ‘\n’ +
request_payload
| Argument | Description |
| HTTP_METHOD | Uppercase HTTP method name used with the request. For more information, see section 9. |
| host_with_port | Internet host and port number. (api.price2spy.com:443) |
| content_type | This header must be “application/json” for POST and PUT requests. If DELETE request has a body, it must be provided as well. |
| resource_path | Concatenation of request absolute URI path and query string. For more information, see section 3.3. |
| date_in_unix_epoch | This header must be UNIX Epoch time and must be within 15 minutes of the current time. This date is included to prevent replay attacks. |
| request_payload | Request body in JSON format. It must be provided even if there is no body. For requests without a body an empty string can be provided. |
Generating the signature
Example POST:
- Concatenate the string (with \n):
string-To-Sign=
POST
api.price2spy.com:443
application/json
/rest/v1/get-products
1700485915
{"active": true}- Hash this string with SHA256 using your secret key.
- Encode the hash to a Base64 string.
Example GET:
- Concatenate the string (with \n):
string-To-Sign=
GET
api.price2spy.com:443
/rest/v1/get-brands
1700485915
"" Just an empty string for the payload, does not represent actual quotation marks.- Hash this string with SHA256 using your secret key.
- Encode the hash to a Base64 string.
HMAC related errors
{“message”:”Hmac signature mismatch”}
HMAC signature mismatch – The client generated hash value and the server generated hash value does not match.
{“message”:”Authorization header with HmacSHA256 scheme not provided”}
Provide a valid Authorization HTTP request header.
{“message”:”Hmac invalid timestamp header”}
Timestamp header not provided in the correct format.
{“message”:”Hmac missing timestamp header”}
Timestamp header not provided in the request.
Old authentication method
The authentication method below is outdated and will become obsolete in the near future. We recommend all of our clients to update their systems to incorporate HMAC authentication before the end of the grace period. To facilitate a smooth transition, we are providing a 6-month period where you will still be able to use the old authentication method.
If a client uses REST API, he cannot use the API key in the format that we have sent it – decoded. This point represents the problem’s core.
What do you need to do?
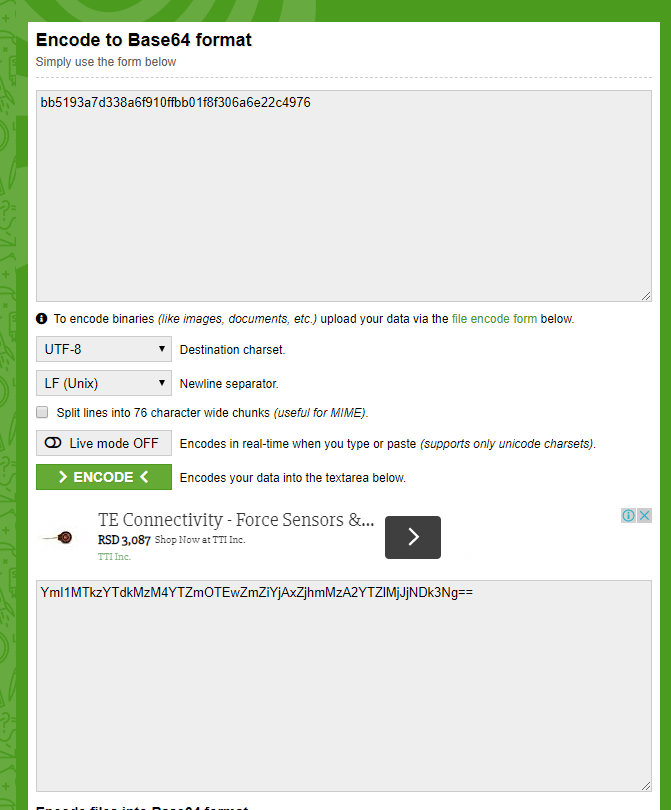
- The API key needs to be encoded first. For that purpose, you can use the following link: – https://www.base64encode.org/. Here you need to paste your API key (usually provided by the account manager), then to click ENCODE, and finally to copy the encoded API key.
The example of this process is shown in the screenshot below.
2. Once encoded, you need to copy the key into swagger – https://api.price2spy.com/rest/swagger-ui.html – the test tool which is also available on the documentation link.
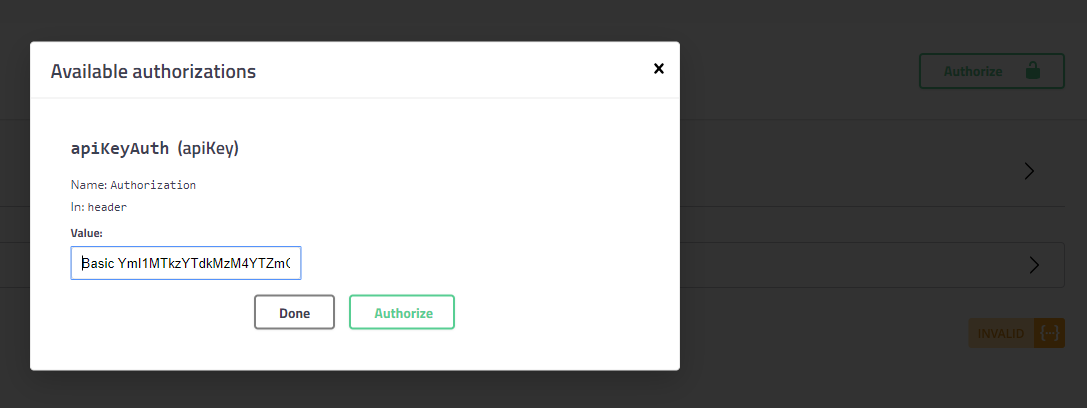
However, there is also another mid-step that is required – it is not enough to just copy the API key. You need to add Basic in front of the encoded API key.
So, it should look like this: Basic YmI1MTkzYTdkMzM4YTZmOTEwZmZiYjAxZjhmMzA2YTZlMjJjNDk3Ng== and then click Authorize (Screenshot 2).
There is an explanation in the API documentation, too. Please see it below:
REST Authentication is performed by adding Authorization header to your REST
API requests. The content of the header is *Basic<Base64Encoded_API_KEY>*
Example:
Authorization = Basic YmI1MTkzYTdkMzM4YTZmOTEwZmZiYjAxZjhmMzA2YTZlMjJjNDk3Ng==
Hopefully, now you have a bit clearer picture of how the process of REST API authorization works! Of course, for all additional questions that you might have, please feel free to contact us.


